
Battery connection#
The robot has a switch to connect or disconnect the battery from its power board. The switch is controlled by a knob on the left side of the torso, above the battery indicator and charger connector. In order to switch on the robot the knob should be rotated on the ON position, as explained in {numref}`batery-switch.
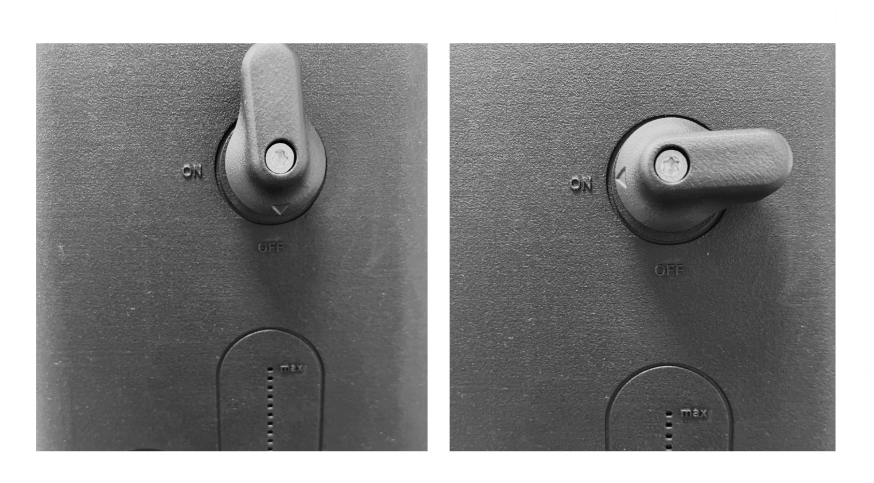
Fig. 16 Battery switch with knob in disconnected position on the left and in connected position on the right.#
User panel#
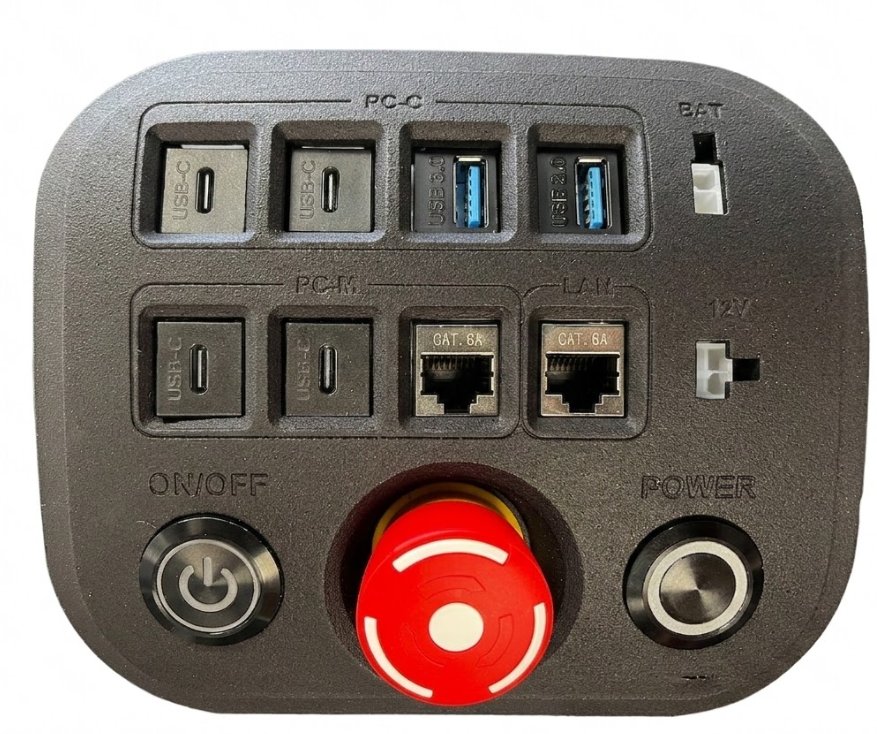
Fig. 17 User panel of the Kangaroo robot#
Fig. 17 shows the user panel of the Kangaroo robot which is located on the upper part of the robot. ON/OFF switch button is located on the lower left corner, Emergency Button is at the center in the lower part and the POWER pulse botton is in the lower right corner.
Switch ON/OFF the Robot#
Before switching on the robot, both Emergency buttons, the one in the user panel and the wireless emergency button, shall be released: rotate each button counterclockwise to ensure they are released. The wireless emergency button shall have sufficient charging level to be detected by the receiver, otherwise the robot will not be able to correctly function and errors will appear in the webcommander.
CAUTION
The autonomy of the battery of the wireless emergency button is 12 hours when fully charged, meaning that it should be charged daily for ensuring sufficient charge for daily operating the robot
CAUTION
In the situation of having the wireless emergency button damaged or discharged, it is possible to bypass it and ignore its status by pressing a button located on the lower right side of the torso. When the wireless bypass switch is pressed, only the emergency button on the robot user panel will be operational to safely stop the robot.
To turn on the robot:
Press the main “ON/OFF” switch button on the left side of the user panel: button’s LED will light up solid WHITE.
Afterwards, press the “POWER” pulse button for 1 second, LEDs will light up briefly in WHITE and then start blinking GREEN while waiting for PCs to boot up, wireless emergency button and proper motor voltage.
If everything has started correctly the “POWER” button LEDs will be solid GREEN.
To turn the robot off one has to follow the opposite procedure: first pressing the “POWER” button for longer than 1 sec. This will make the “POWER” button LEDs start blinking until the PCs and the electronics will be off.
After the “POWER” LEDs turn off, the main “ON/OFF” button can be released and its LEDs will turn off.
CAUTION
“POWER” LEDs will be fixed RED if any emergency button is pressed (check Emergency button status)
CAUTION
“POWER” LEDs will blink RED when wrong motor voltage feedback is detected (Try a full robot reboot and if error is still present contact technical support)