🔧 Network Configuration Advanced: WireGuard VPN#
For secure and remote integration into a larger network infrastructure, the robot supports WireGuard VPN. This allows:
Encrypted, authenticated remote connections
Seamless integration into enterprise or institutional networks
Secure access to services and data across different sites
The robot’s router acts as a standard WiFi client, using only one IP address on the building network. However, because the robot is made up of multiple computers (e.g., Control PC, Multimedia PC), VPN is used to enable individual access to each of these devices regardless of the network’s complexity.
Assuming the robot is already connected to the building network, the development computers (laptop or desktop PCs used by researchers or students that need to connect to the robot) have to be integrated into the robot’s VPN.
Note
Please note that the robot remains accessible as an access point (Standalone Mode), regardless of its connection to the network infrastructure or Internet access.
To setup the robot with the Wireguard VPN:
Log in to the router as described in the Accessing the Router.
Locate the Robot’s VPN Key
Go to the WireGuard interfaces tab.
Select
wireguard_LAN.Take note of the Public Key listed (make sure it’s the LAN one, not the WAN).

Install WireGuard on Your Workstation
sudo apt install wireguard-tools
Generate Your Keys
wg genkey | sudo tee /etc/wireguard/private.key | wg pubkey | sudo tee /etc/wireguard/public.key
Assign Your VPN IP Choose a unique IP address in the robot’s WireGuard LAN subnet. Use the format: 172.24.X.Y/24, where: X = robot serial number Y ≥ 100 for external devices
CAUTION
Avoid using reserved addresses
IP |
Device |
|---|---|
172.24.X.1 |
Control PC |
172.24.X.2 |
Multimedia PC |
172.24.X.5 |
Router |
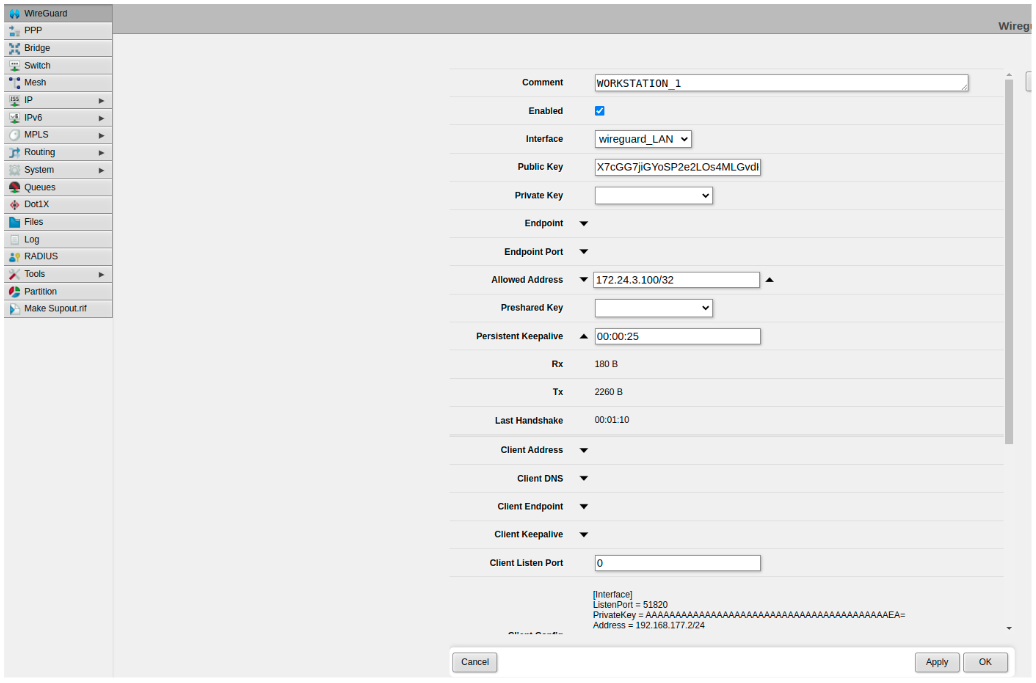
Register Your Workstation as a Peer:
Create a new peer on the robot’s router.
Choose wireguard_LAN as the interface.
Copy your public key (the one you generated) to the Public Key field in the router configuration.
In the Allowed Address field, enter the WireGuard IP address assigned to your workstation. This address should be in the format 172.24.X.Y/24, where X corresponds to the WireGuard network of the robot and Y is the octet designated for your workstation.
Set “Persistent Keepalive” to 25
Tip
For the first workstation, it is safe to use 172.24.X.100/24, for the second one 172.24.X.101, and so on.
CAUTION
Ensure that all other peers are within the same range, 172.24.X.Y/24, and that their IP addresses do not conflict with any existing ones.
Create Your VPN Configuration Create /etc/wireguard/wg0.conf on your workstation with the following content:
[Interface]
Address = 172.24.X.Y/32
PrivateKey = YOUR_PRIVATE_KEY # Substitute it by the generated private key

[Peer]
PublicKey = ROUTER_PUBLIC_KEY # Substitute it by the router public key you took note
AllowedIPs = 172.24.X.Y/24
Endpoint = ROBOT_IP:51820 # Substitute it by the robot IP in your network
PersistentKeepalive = 25
Start the tunnel Start Wireguard interface in your workstation
sudo wg-quick up wg0
If everything went well, you should see transmitted and received traffic issuing
sudo wg show wg0
And you should be able to ping the router’s tunnel IP:
ping 172.24.X.5
And the robots’ pcs tunnels:
ping 172.24.X.1
ping 172.24.X.2